Основные команды diskpart
Содержание:
- Listing Linux a Partition Size Larger Than 2TB
- Использование сценариев DiskPart
- Extend a Hard Drive Volume
- diskpart in Windows 7
- Копирование файлов на флешку
- Other ways to format disk partition
- Видео-инструкция
- sfdisk Command
- List Partitions Under Linux
- Проверка диска на ошибки и bad blocks
- Способ 2: с помощью специальных программ
- Using lsblk Command:
- Как работает diskpart
- Создание EFI-раздела перед Windows
- Заключение
Listing Linux a Partition Size Larger Than 2TB
The fdisk or sfdisk command will not list any partition size larger than 2TB. To solve this problem you need to use GNU parted command with GPT partitions. It supports Intel EFI/GPT partition tables. Partition Table (GPT) is a standard for the layout of the partition table on a physical hard disk. It is a part of the Extensible Firmware Interface (EFI) standard proposed by Intel as a replacement for the outdated PC BIOS, one of the few remaining relics of the original IBM PC. EFI uses GPT where BIOS uses a Master Boot Record (MBR). In this example list partitions on /dev/sdb using the parted command:
Sample outputs:
GNU Parted 2.3
Using /dev/sdb
Welcome to GNU Parted! Type 'help' to view a list of commands.
(parted)
Set unit type to TB or GB by typing ‘unit TB‘ or ‘unit GB‘ at the (parted) prompt:
OR
To list partitions type print command at the (parted) prompt:
Sample outputs:
Model: ATA ST33000651AS (scsi)
Disk /dev/sdb: 3001GB
Sector size (logical/physical): 512B/512B
Partition Table: gpt

Number  Start   End     Size    File system  Name     Flags
 1      0.00GB  3001GB  3001GB  ext4         primary

(parted)
To exit from parted session type ‘quit’ at the (parted) prompt:
How Do I List All Partitions Layout On All Block Devices?
Pass the -l OR –list option to the parted command to lists partition layout on all block devices:
Sample outputs:
Fig.01: Show Linux Disk Partitions With GNU parted Command
Использование сценариев DiskPart
Способ использования сценариев с DiskPart слегка отличается от такового для других команд. Причина в том, что DiskPart — это интерпретатор командной строки, а не обычная утилита. Когда вы запускаете DiskPart (вводом diskpart в командной строке), интерпретатору нужно сообщить о том, что вы хотите использовать сценарий, добавив параметр /S, как показано ниже:
diskpart /s ИмяСценария.txt
где ИмяСценария.txt — имя текстового файла с нужным сценарием. По умолчанию DiskPart записывает вывод в текущую командную строку.
При выполнении сценариев DiskPart проверяйте следующие коды ошибок:
- 0 — ошибок нет, сценарий выполнен полностью;
- 1 — фатальное исключение (возможно, наличие серьезных проблем);
- 2 — некорректные параметры команды;
- 3 — не удалось открыть указанный файл сценария или выходной файл;
- 4 — сервис, используемый DiskPart, вернул код ошибки или сообщил о неудаче;
- 5 — неправильный синтаксис команды (обычно из-за неверного выбора диска, раздела или тома, либо из-за невозможности его использования с данной командой).
Пример сценария DiskPart
Используя сценарии DiskPart, все операции, которые вы хотите выполнить, нужно завершить в рамках одного сеанса. Сценарий должен содержать все необходимые вам команды DiskPart. Включать в сценарий команду EXIT не требуется, так как в конце сценария интерпретатор автоматически завершает свою работу.
- rem Выбираем диск 2
- select disk 2
- rem Создаем основной (primary) раздел на диске
- rem и назначаем ему букву диска
- create partition primary size=4096assign letter=s
- rem Создаем дополнительный (extended) раздел
- rem с двумя логическими дисками
- create partition extended size=4096
- create partition logical size=2048
- assign letter=u
- create partition logical size=2047
- assign letter=v
В этом примере создаются основной и дополнительный разделы на диске 2. Размер основного раздела определен в 4096 Мб и ему назначается буква S. Размер дополнительного раздела определен в 4096 Мб; в нем создается два логических раздела: первый — размером 2048 Мб с буквой U, второй — размером 2047 Мб с буквой V. Такие размеры логических разделов заданы из-за некоторых потерь дискового пространства при разбиении на разделы. Вы также могли бы создать единственный логический раздел размером 4096 Мб.
Нередко случается, что многие современные компьютеры не имеют дисковода. Это нередко вызывает затруднения, в особенности, когда необходимо установить программу с установочного диска. Чаще всего проблема возникает при установке или переустановке операционной системы Windows на такой компьютер. Чтобы избежать таких проблем предлагается создать загрузочный usb-накопитель
, который будет выполнять все функции в точности, как и установочный диск.
Для создания загрузочного usb-накопителя или иногда его ещё называют загрузочной флешкой с помощью командной строки «cmd», необходимо выполнить простой алгоритм действий в два этапа. В первом этапе будет задействовано использование стандартной утилиты под названием diskpart
.
Extend a Hard Drive Volume
If you have an existing hard drive volume that doesn’t take up all of the free space on a drive, and you wish to enlarge it, Diskpart commands allow you to do that.
Start by selecting your chosen disk with select disk #, replacing # with your disk number (and using list disk to find your disk number, if you don’t know.)
- Type list volume to list all the available volumes on your PC, then type select volume #, replacing # with the volume you’re looking to extend.
- Type extend to expand it to the maximum size available. Diskpart will confirm whether or not the extend command has worked correctly. Confirm the size of the volume has increased by typing list volume for a second time afterward.
Diskpart has other options available, as the help command briefly explains. If you need further information on how to use Diskpart, Microsoft has further Diskpart support information available.
diskpart in Windows 7
On Windows 7 systems, you can access diskpart .
Note that you need to run these steps as an Administrator on Windows 7 computers.
If you can boot into Windows 7
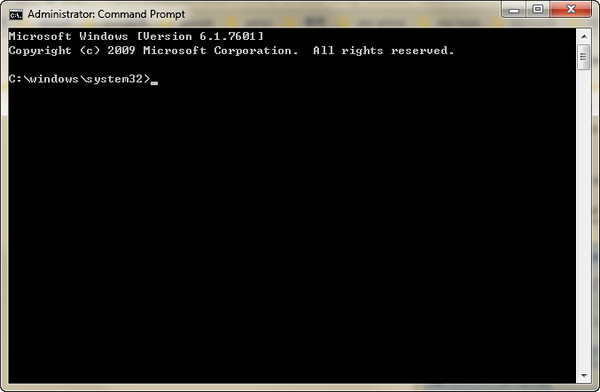
If you can boot into your Windows 7 system, simply open Command Prompt:
- Boot into Windows 7
- Click Start
- Type
- Click Command Prompt from the search results list. Right-click on Command Prompt > Run as Administrator.
- When Command Prompt loads, type
- Press Enter
For the full list of diskpart commands and paremeters, go to .
If you can’t boot into Windows 7
Similar to Windows Vista, if you can’t boot into your system, you have the following options:
- Use the installation disc
- Boot into the Advanced Boot Options menu to access System Recovery Options
- Use Easy Recovery Essentials and access Command Line
If you have the installation disc:
If you can’t boot into Windows 7, but you have the installation disc, you can run diskpart using the disc. To do so, follow these steps:
-
- Insert the disc in the optical drive of your computer
- Restart the computer
- Press any key to boot from the disc
- Select your preferred language, time and keyboard
- Click Next
- Click Repair your computer at the Install Windows screen
- Select the operating system from the list
- Click Next
- Select Command Prompt
- Type diskpart
diskpart
- Press Enter
For the full list of diskpart commands and paremeters, go to .
If you don’t have the installation disc:
Usually, Windows 7 systems should have the System Recovery Options installed on the hard drive. If it’s not (follow steps below), go to the “If you use Easy Recovery Essentials” set of instructions below for an alternative to access diskpart.
Follow these steps to access diskpart without an installation disc on a Windows 7:
- Restart the computer
- Press F8 as the computer starts to boot. Press F8 before the Windows 7 logo appears.
- Select Repair Your Computer at the Advanced Boot Options screen
If Repair Your Computer is not listed, System Recovery Options is not installed on your PC. Go to If you use Easy Recovery Essentials for an alternative.
- Press Enter
- Select Command Prompt
- Type
- Press Enter
For the full list of diskpart commands and paremeters, go to .
If you use Easy Recovery Essentials:
Easy Recovery Essentials can run from any CD, DVD or USB flash drives.
To access diskpart using Easy Recovery Essentials, follow these steps:
- Download Easy Recovery Essentials
- Burn the ISO Image. Follow our instructions on how to burn a bootable ISO image. If you’d like to have a recovery USB instead, follow our instructions on how to make a recovery USB.
- Boot Easy Recovery Essentials from the CD, DVD or USB
- Select Launch Command Line
Копирование файлов на флешку
Следующим этапом станет копирование установочных файлов
программы на флеш-накопитель. Копировать нужно все файлы полностью со всей структурой и каталогами.
Сделать это можно с применением стандартных инструментов Windows типа «Проводник». Если вы хотите в силу разных возможных причин сделать это с помощью той же самой командной строки, то в этом вам помогут следующие команды:
- Улучшенная команда копирования «robocopy
», в отличие от устаревшей «copy» может копировать вложенные папки со всем содержимым. В качестве первого аргумента команды выступает путь к копируемым файлам, а второго — путь к папке, в которую будет выполнено копирование файлов. Для копирования вложенных папок необходимо добавить третий аргумент «/E
», иначе будет скопированы только файлы. Например, чтобы скопировать все файлы с диска f на флешку с именем g: вам требуется ввести команду: robocopy f:\ g:\ /E - Устаревшая команда копирования файлов «copy
», воспользовавшись которой можно скопировать только файлы (папки придется создавать вручную командой «md»). В качестве первого аргумента команды выступает путь к копируемым файлам, а второго — путь к папке, в которую будет выполнено копирование файлов. Чтобы дать понять команде, что вы хотите скопировать не один файл в папке, а все файлы, в качестве имени файла укажите код «*.*». - Команда смены диска, формат которой такой: ДИСК:. Т.е. для перехода на диск «D:\» необходимо ввести такую команду: d:
- Чтобы выбрать директорию, расположенную в текущей папке введите cd
, например: cd win10 - Для перехода на верхний уровень файловой иерархии введите cd \
- Для перехода к родительской папке напишите cd ..
- Чтобы посмотреть перечень файлов текущей папки, введите команду dir
- Для создания папки запустите команду md
Знания указанных команд достаточно для успешного копирования файлов на флешку.
Вот как это будет выглядеть для случая копирования установочных файлов, расположенных на диске d:\win10 и флешки с именем «G:\». Подготовка и запуск robocopy
:
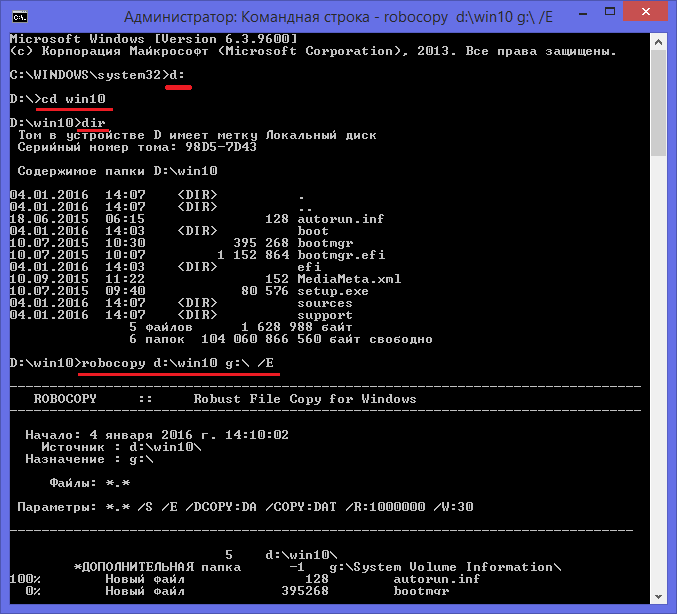
Через определенное время все файлы будут успешно скопированы:

Чаще всего загрузочный флеш-накопитель используют для установки либо переустановки операционной системы. При отсутствии дисковода можно воспользоваться виртуальным DVD-приводом и файлом-образом.
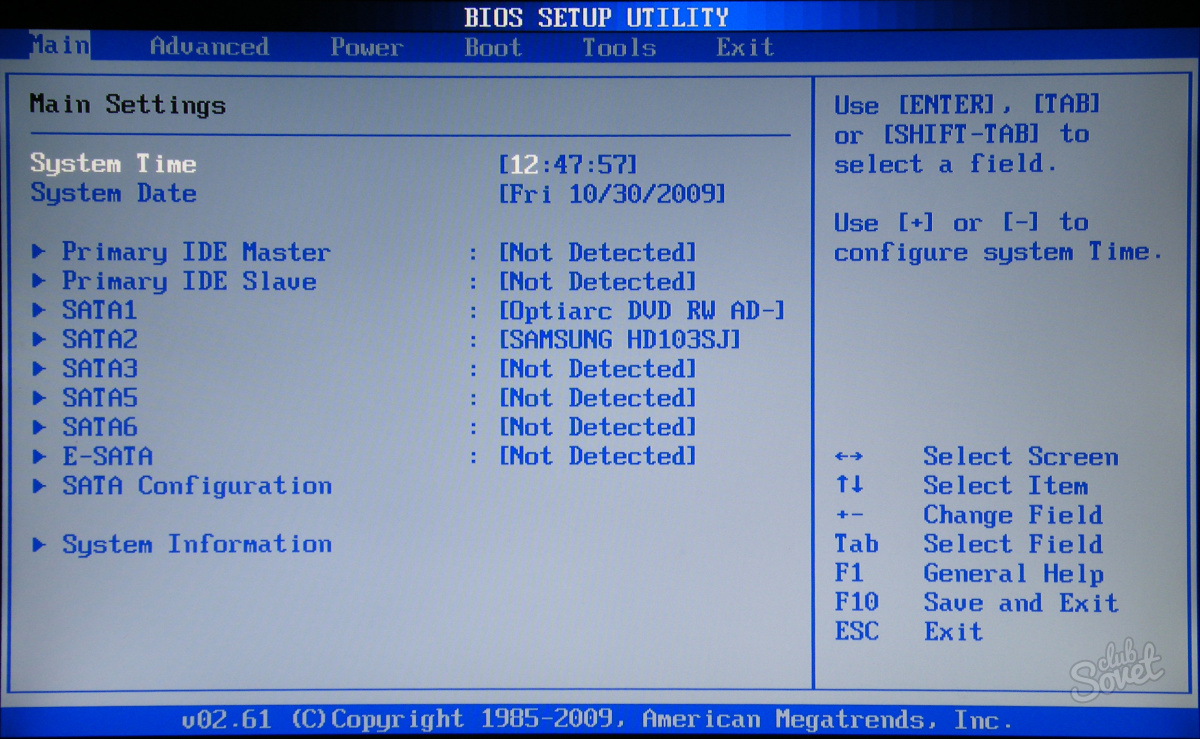
При установке операционной системы с загрузочного флеш-накопителя, в BIOS необходимо изменить настройки так, чтобы компьютер загружался именно через это устройство.
Other ways to format disk partition
DiskPart should be the best way to format disk partition, and it is widely used in
Windows Vista/7/8/8.1/10, however, it doesn’t support Windows XP. If you are
using XP, how do you manage disks with command line? Besides, if you use DiskPart to
format partition installed with system files, you may be failed and receive an Windows error code 0x80070057, what would you do?
Fortunately, there are many other ways to instead of DiskPart format disk partition.
Format disk partition with AOMEI Partition Assistant command line
AOMEI Partition Assistant Professional is a
great tool that can help you format partition with command line in a quick way.
First, you need to open the command prompt by clicking Start->type cmd, right click the program->select Run as
Administrator. If you work with Windows 10, pressWin+X, select Command Prompt (Admin).
Then, you can follow the next content to format a drive with AOMEI Partition
Assistant.
1). Type cd C:\Program Files\AOMEI Partition Assistant Pro Edition
6.3, press Enter. The path is your AOMEI Partition
Assistant installation directory. Then, type partassist.exe
/list, press Enter.
2). It will skip to the AOMEI Partition Assistant command Prompt, and list all disks
on your computer.
3). Typepartassist.exe /list:0, the 0 refers to the disk
you want to list volumes on it. Press Enter.
4). It will show you a new window to list the volumes on the disk 0.
5). Type partassist.exe
/fmt:E /fs:ntfs /label:Play to format the FAT32 to NTFS.
Press Enter.
6). Wait till the task done.
Notes:
-
«/fmt»
followed by partition number or drive letter, and the partition number
starts with 0. If the specified value is drive letter, disk number can
be ignored. -
«/fs» means file system, whose value can be fat16, fat32 or
ntfs. -
«/label» means you can add any name of the partition.
Format disk partition with GUI
The truth is that not everybody likes to use command prompt to format disk partition. For those people, format partition with GUI instead of DiskPart format is
a greater choice. The AOMEI Partition Assistant Standard provides the easiest UI to format the partition free. With it, you can format disk partition with only few clicks. Here you can do
as following steps:
Step1. Free download AOMEI Partition Assistant Standard, install and launch it, and you can
see the main interface of your disk(s). Select the partition you want to format,
right click on it, select «Format Partition» in the
pop-up menu.
Step2. Here you can give a partition label and format the partition
to what kind of file systems. Click OK.
Step3. Finally, click Apply at the toolbar to
execute all operations.
You can format every partition on your hard drive. Or you can initialize disk directly. Both of
them will delete the data on the hard drive, so if there are some important data
stored on your hard drive, please backup them first. You also can create a WinPE bootable usb to format disk partition with AOMEI Partition Assistant. It
should be the best way to replace DiskPart format disk partition.
Видео-инструкция
sfdisk Command
The sfdisk command act as a partition table manipulator for Linux. You can use this tool to list partitions too:
Sample outputs:
71669760

Disk /dev/sda: 8922 cylinders, 255 heads, 63 sectors/track
Units = cylinders of 8225280 bytes, blocks of 1024 bytes, counting from 0

   Device Boot Start     End   #cyls    #blocks   Id  System
/dev/sda1   *      0+    104-    105-    838656   83  Linux
/dev/sda2        104+    235-    131-   1048576   82  Linux swap / Solaris
/dev/sda3        235+   8922-   8688-  69781504   83  Linux
/dev/sda4          0       -       0          0    0  Empty
Where,
- -l : List the partitions of a device.
- -s : List the size of a partition.
- -u or -uS or -uB or -uC or -uM : Accept or report in units of sectors (blocks, cylinders, megabytes, respecpively). The default is cylinders, at least when the geometry is known.
List Partitions Under Linux
Open a terminal window (select Applications > Accessories > Terminal). Switch to the root user by typing the su - and entering the root password, when prompted by the su command. Or use the sudo command:
OR
Sample outputs:
Disk /dev/sda: 251.1 GB, 251059544064 bytes
255 heads, 63 sectors/track, 30522 cylinders
Units = cylinders of 16065 * 512 = 8225280 bytes
Sector size (logical/physical): 512 bytes / 512 bytes
I/O size (minimum/optimal): 512 bytes / 512 bytes
Disk identifier: 0x0008fcd3

   Device Boot      Start         End      Blocks   Id  System
/dev/sda1   *           1          14      104448   83  Linux
Partition 1 does not end on cylinder boundary.
/dev/sda2              14       13068   104857600   83  Linux
/dev/sda3           13068       13198     1048576   82  Linux swap / Solaris
/dev/sda4           13198       30523   139163648    5  Extended
/dev/sda5           13198       30523   139162624   83  Linux
The -l options shows the partition tables for the specified devices and then exit. If no devices are given, those mentioned in /proc/partitions (if that exists) are used. You can specify device name as follows (in this example list partitions for /dev/sda):
Проверка диска на ошибки и bad blocks
С выходом файловых систем ext4 и xfs я практически забыл, что такое проверка диска на ошибки. Сейчас прикинул и ни разу не вспомнил, чтобы у меня были проблемы с файловой системой. Раньше с ext3 или ufs на freebsd проверка диска на ошибки было обычным делом после аварийного выключения или еще каких бед с сервером. Ext4 и xfs в этом плане очень надежны.
В основном ошибки с диском вызваны проблемами с железом. Как посмотреть параметры smart я уже показал выше. Но если у вас все же появились какие-то проблемы с файловой системой, то решить их можно с помощью fsck (File System Check). Обычно она входит в базовый состав системы. Запустить проверку можно либо указав непосредственно раздел или диск, либо точку монтирования. Раздел при этом должен быть отмонтирован.
# umount /dev/sdb1
# fsck /dev/sdb1
fsck from util-linux 2.33.1
e2fsck 1.44.5 (15-Dec-2018)
/dev/sdb1: clean, 11/1310720 files, 109927/5242619 blocks
Проверка завершена, ошибок у меня не обнаружено. Так же у fsck есть необычная опция, которая не указана в документации или man. Запустив fsck с ключем -c можно проверить диск на наличие бэд блоков.
# fsck -c /dev/sdb1
Насколько я понимаю, проверка выполняет посекторное чтение и просто сообщает о том, что найден бэд блок. Теоретически, можно собрать все эти блоки в отдельный файл и затем передать их утилите e2fsck, которая сможет запомнить эти бэды и исключить из использования.
# fsck -c /dev/sdb1 > badblocks.txt
# e2fsck -l badblocks.txt /dev/sdb1
На практике я не проверял как это работает и имеет ли вообще смысл в таких действиях. Если с диском замечены хоть малейшие проблемы, я его сразу меняю.
Способ 2: с помощью специальных программ
Рассмотрим две бесплатные и эффективные программы, через которые можно без труда объединять разделы на дисках в интуитивно понятном визуальном интерфейсе.
Aomei Partition Assistant
Программа доступна для загрузки в двух редакциях — платной и бесплатной. Для наших задач вполне подойдет бесплатная.
Главное окно программы выглядит следующим образом: три раздела на диске, один из которых скрыт в окне компьютера — он служит для системных файлов.
Нажмите ПКМ по третьему разделу, в контекстном меню выберите пункт «Изменение размера/перемещение разделов».
Откроется окошко, в котором можно отрезать часть свободного пространства. Левый ползунок освободит место для предыдущего раздела, правый — для последующего. Нажмите кнопку «ОК» для подтверждения.
Появится новое свободное пространство.
Для объединения кликните ПКМ по рабочему разделу и выберите пункт «Изменение размера/перемещение разделов».
Перетяните правый ползунок до конца и нажмите «ОК».
Чтобы программа выполнила назначенные действия кликните по кнопке «Применить».
Поставьте галочку в чекбокс «Check partitions before execution» для проверки разделов перед выполнением и щелкните по «Перейти».
Если требуется объединить два раздела в один, удалите дополнительный в контекстном меню, выбрав пункт «Удаление раздела».
Преимущества программы:
- Русскоязычное меню.
- Интуитивно понятный интерфейс.
- Стабильность в работе.
- Возможность работать в бесплатной версии.
MiniTool Partition Wizard Free
MiniTool Partition Wizard Free не уступает своему конкуренту и содержит все базовые инструменты для работы с дисками и разделами.
В главном меню программы выберите раздел, от которого нужно отрезать пространство или удалить. Нажмите ПКМ и выберите один из пунктов:
- «Move/Resize» для изменения размера.
- «Delete» для удаления раздела.
При помощи поля «Size and Location» можно отрезать свободное пространство, передвигая ползунки.
Для объединения кликните ПКМ по активному разделу и откройте меню «Move/Resize».
Перетяните ползунок вправо и нажмите «ОК».
Для выполнения назначенных действий нажмите кнопку «Apply».
Преимущества программы:
- Не грузит систему, можно работать даже на слабых ПК.
- Имеет все базовые инструменты в бесплатной редакции.
Из минусов: нет возможности по умолчанию выбрать русский язык.
Using lsblk Command:
You can list all the attached disks on your computer from Ubuntu using the lsblk command as follows:
$ sudo lsblk

The ones with the TYPE disk are the physically attached disks on your computer.

The ones with the TYPE part are the partitions of the disks.

The lsblk command without any filter shows a lot of loop devices that are used by the Ubuntu snap apps. It is annoying I know. Luckily, you can easily get rid of them from the list.
You can use the -e7 option with lsblk to hide the loop devices.
$ sudo lsblk -e7

Now that the loop devices are gone, the list looks much clearer now.

You can also do the same thing with grep.
$ sudo lsblk | grep -v ‘^loop’

You can also hide the CD/DVD rom device from the list. Just add the -e11 option along with -e7 option.
$ sudo lsblk -e7 -e11

You can also list the attached disks on your computer, and their vendor and model information using lsblk as follows:
$ sudo lsblk —scsi

As you can see, all the attached disks on my computer are listed. Their vendor and model information are also listed.

Using fdisk Command:
You can also list all the attached disks on your computer from Ubuntu using the fdisk command as follows:
$ sudo fdisk -l

fdisk shows all the disks, their total size, their partitions, size of each partitions etc. But sadly, the list is too long and there is no easy way to hide the loop devices.


But if you know the device name (i.e. sda, sdb) of your disk, you can find more information about it very easily with fdisk.
$ sudo fdisk -l devsdb

You can also find information about more than one disk at the same time with fdisk. Just put the disks paths as fdisk arguments one after the other.
$ sudo fdisk -l devsda devsdb

Using parted Command:
You can use parted to do the same thing. parted may not be installed by default on Ubuntu. But you can easily install it with the following command:
$ sudo apt install parted -y

You can get a fdisk like output for all the storage disks attached on your computer with parted as follows:
$ sudo parted -l

As you can see, the output format is the same as in fdisk, but parted does not list the annoying loop devices. That’s a good thing.

Using GNOME Disks App:
If you don’t like to use the command line, then there are many graphical programs you can use to list disks on Ubuntu.
GNOME Disks is the default partitioning app on GNOME desktop environment. You can use it to list the disks attached on your computer.
First, open GNOME Disks from the Application Menu.

GNOME Disks should be opened. On the left side, you will see all the attached storage devices/disks on your computer. To find more information about the disk, click to select the disk. The disk size, partitions and other information about the disk should be listed on the right side.

Using GParted App:
If you don’t like the command line, then you can also use the GParted Partition Editor app to list all the attached disks on your computer.
GParted is not installed by default on Ubuntu. But you can easily install GParted with the following command:
$ sudo apt install gparted -y

GParted should be installed.

Now, you can start GParted from the Application Menu.

In order to use GParted, you will need superuser privileges. Type in your login password and click on Authenticate.

GParted should start. You can select a disk from the dropdown menu at the top right corner of GParted.

As you can see, all the disks attached on my computer is listed in the dropdown menu. Just select a disk from the list.

The partitions of your selected disk should be displayed.

So, that’s how you list all the disks attached on your computer from Ubuntu.
I’ve shown some of the common methods in this article. If you know of listing disks any other way on Ubuntu, be sure to let me know.
Thanks for reading this article.
Как работает diskpart
Создание загрузочного флеш-накопителя через консольную утилиту diskpart
является быстрым и доступным способ. Благодаря тому, что данная утилита работает в текстовом режиме, каждый пользователь персонального компьютера с легкостью справится с такой задачей.
С быстрым развитием технологий, каждому человеку доступен выход в Интернет, где можно найти бесплатные версии различных программ по созданию загрузочного флеш-накопителя
Однако случается и такое, что доступ к Интернету отсутствует в силу каких-либо обстоятельств, поэтому важно знать несколько простых альтернативных способов создания загрузочного флеш-накопителя
Один из них — описанный метод, применяющий командную строку. Такой ручной способ пригодится каждому пользователю ПК. Эта консольная утилита входит в перечень стандартных программ
. Нет необходимости дополнительно искать и устанавливать какие-либо другие программы по настройке загрузочного флеш-накопителя. Через десять минут использования diskpart готова загрузочная флешка с установочным файлом Windows.
Создание EFI-раздела перед Windows
Загрузочный раздел обычно существует в начале диска, перед системным разделом. Так не обязательно должно быть, но делается с целью ускорения запуска Windows. Чтобы UEFI быстрее нашла загрузчик. На SSD такая оптимизация вряд ли будет ощутимой, а вот в случае с HDD можно побороться пусть даже за толику производительности.
На борту LiveDisk Стрельца запускаем AOMEI Partition Assistant. Делаем клик на системном разделе, на боковой панели операций жмём «Изменение размера».
Немного оттягиваем ползунок на карте вправо, чтобы в графе ниже «Незанятое пространство перед» появилось несколько Мб. Далее вместо оттянутой цифры вписываем 105. Чтобы получилось 105 Мб. Жмём «Ок».
В итоге программа высвободит корректное значение дискового пространства, в нашем случае 102,01 Мб. И оставит небольшой хвост сзади раздела. Жмём «Применить».
Подтверждаем.
Далее можем присоединить хвост к разделу.
Теперь запускаем командную строку. И создаём EFI-раздел точно так же, как описано в п.1 статьи.
Вот EFI-раздел создан.
Осталось только пересоздать загрузчик, как описано в конце п.3 статьи.